If you’re actively using Microsoft Teams in your organization, chances are you’ve already heard about team owners and members. And while the difference between the two seems very straightforward at first, there are some details about ownership and membership in Teams that you should be aware of to collaborate more efficiently and secure your teams.
In this blog we will explain what Microsoft Teams owners and members can and cannot do and share some best practices that will help you increase your teams’ security.
Microsoft Teams owners vs. members: what’s the difference?
Team owners
Owners and members are user roles in Microsoft Teams. A user that creates a team is given the owner status by default. This status enables them to manage and monitor the team. They can invite and remove members and configure team settings and permissions. After adding users to the team, team owners can promote them to owner status.
Team owners can also see the names of all private channels of the team. However, they do not have access to their files and conversations unless they are members of private channels.
There may (and should) be multiple owners in a team.
Team members
Members are users who form a part of a team. They can view team files, post messages in channels and do other collaboration activities unless these capabilities have been turned off by team owners. For example, create private and standard channels and add apps. They can also add other users to the team if it’s public or request a team owner to add members if the team is private.
Below you can find the list of capabilities available for each role.
| Capability | Owner | Member |
| Create a channel | ✓ | ✓ |
| Participate in a private chat | ✓ | ✓ |
| Participate in a channel conversation | ✓ | ✓ |
| Share a channel file | ✓ | ✓ |
| Share a chat file | ✓ | ✓ |
| Add apps (such as tabs, bots, or connectors) | ✓ | ✓ |
| Can be invited via any work or school account for Microsoft 365 | ||
| Create a team | ✓ | ✓ |
| Delete or edit posted messages | ✓ | ✓ |
| Discover and join public teams | ✓ | ✓ |
| View org chart | ✓ | ✓ |
| Add or remove members and guests | ✓ | |
| Edit or delete a team | ✓ | |
| Set team permissions for channels, tabs, and connectors | ✓ | |
| Change the team picture | ✓ | |
| Add guests to a team | ✓ | |
| Auto-show channels for the whole team | ✓ | |
| Control @[team name] mentions | ✓ | |
| Allow @channel or @[channel name] mentions | ✓ | |
| Allow usage of emoji, GIFs, and memes | ✓ | |
| Renew a team | ✓ | |
| Archive or restore a team | ✓ |
Who are Teams Permanent owners and members?
There is a way, however, to prevent occurrence of orphaned teams by making sure the right people are always added as owners to new teams, becoming Permanent owners. This capability can be enabled at the template level with Collaboration by SalesTim.
Similarly, you can add Permanent members at the template level so that all people involved in a specific project are added automatically.
To help you better understand how it works let us give you an example.
Project Management example
Say, you are a project manager and together with your team you work on dozens of projects every quarter. Each of those projects requires a separate team in Microsoft Teams, but it’s always the same (or mostly the same) people who form these teams.
To accelerate and smoothen the collaboration process you’ve decided to have a Project Management template on which you can base all your Project Management teams. You can add all the content your teams will need, including private and standard channels, files, folders, and apps. Additionally, you can configure governance policies. In our case, we will focus on Membership policies.
There, you may want to add yourself – the Project Manager – as a Permanent owner, and a few other co-workers. You can also add thew rest of your project management team as Permanent members, so that they’re automatically added to all Project Management teams.
Moreover, you can configure Mandatory membership, which allows you to specify the minimum number or owners and members in teams created from this template. This feature will prevent you from having ownerless teams or teams with a small number of users that contribute to Teams sprawl.
By default, in Microsoft Teams the requester is added as an owner. However, you can disable this feature at the template level. Keep in mind though, that doing so may result in deceptive user experience as the requester will expect to have administrative rights for the team they’re creating.
Having Permanent owners and members will foster a more consistent and structured teamwork, will save the time on organizing teams and promote better team security.
How to add owners and members to teams
Whether or not you can add owners and members to a team will depend on whether you’re a team owner yourself and whether your team is public or private.
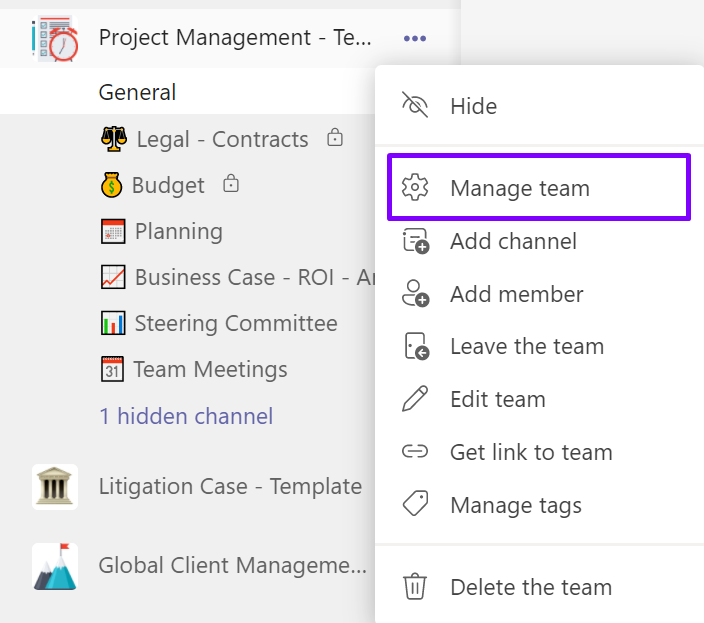
To figure it out, select the team you need on the left navigation bar in your Teams environment and click on […] More options > Manage team.

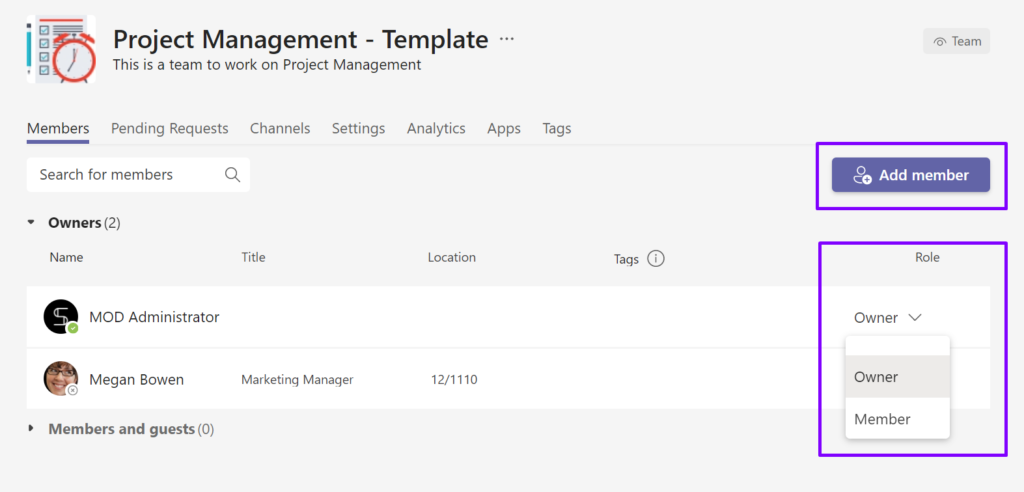
There you will see the list of owners and members.
Click on +Add member and choose the person you’d like to add.
Now, if the team is private and you’re a team owner, the person will be added automatically. However, if you’re a team member, you will first need to receive a request approval.
In a public team an invited user will be added automatically unless this capability was disabled by a team owner.
If you’re a team owner and you want to grant the owner status to a team owner, simply find the person you need under Members and guests and under Role select Owner. The same way, you can change other team owners’ status to Member.

At the template level with SalesTim
To add Permanent owner and members to your teams, you will need to build a Collaboration template and configure its Membership policy.
Here’s how to do it:
Step 1. Create an Original team on which you’ll base your template. Add all the needed content: create private and standard channels, upload files and folders, configure tabs with apps, etc.
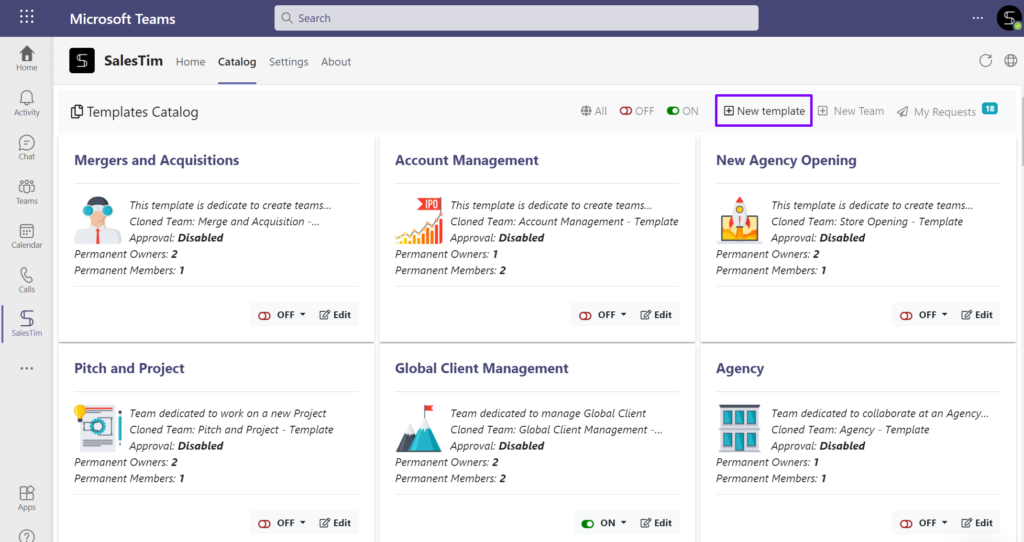
Step 2. Open SalesTim app and head over to Catalog.
Step 3. Click +New template and select the Original team you just created.

Step 4. Configure all the required governance policies and move on to Security.
Step 5. Type the number of Mandatory owners and members.
Step 6. Select who you want to add as Permanent owners and members and click Save.

Your template is ready! Now, whenever your users create new teams from this template, they will automatically add the Permanent owners and members you specified in the template.

Talk to our team to learn more about Collaboration templates and how they can streamline collaborative processes in your organization.

