Whether you need to approve your annual budget plan or an updated sales deck sent to your key account, getting things approved is an essential part of almost each organizational process. And often this process requires multiple steps of sharing docs, organizing meetings, and waiting for responses from various stakeholders. With Power Automate flows you’re able to automate your approval process, save working hours and boost your team productivity. We already discussed how to build simple Power Automate flows with approvals. And in today’s article, we will walk you through how to build workflows in Power Automate with multiple approvals.
Why do you need multiple approvals?
Suppose you’re a project manager and you need to approve project files that your team share during their daily activities. Then you can build a simple Power Automate flow with only one step approval process. In this case, you will get a notification each time your team members create a new file or SharePoint item.
But sometimes, an approval workflow requires a pre-approval before the final approver is required to sign off. For instance, before a general project plan is sent to the stakeholders, it must be approved by the project manager.
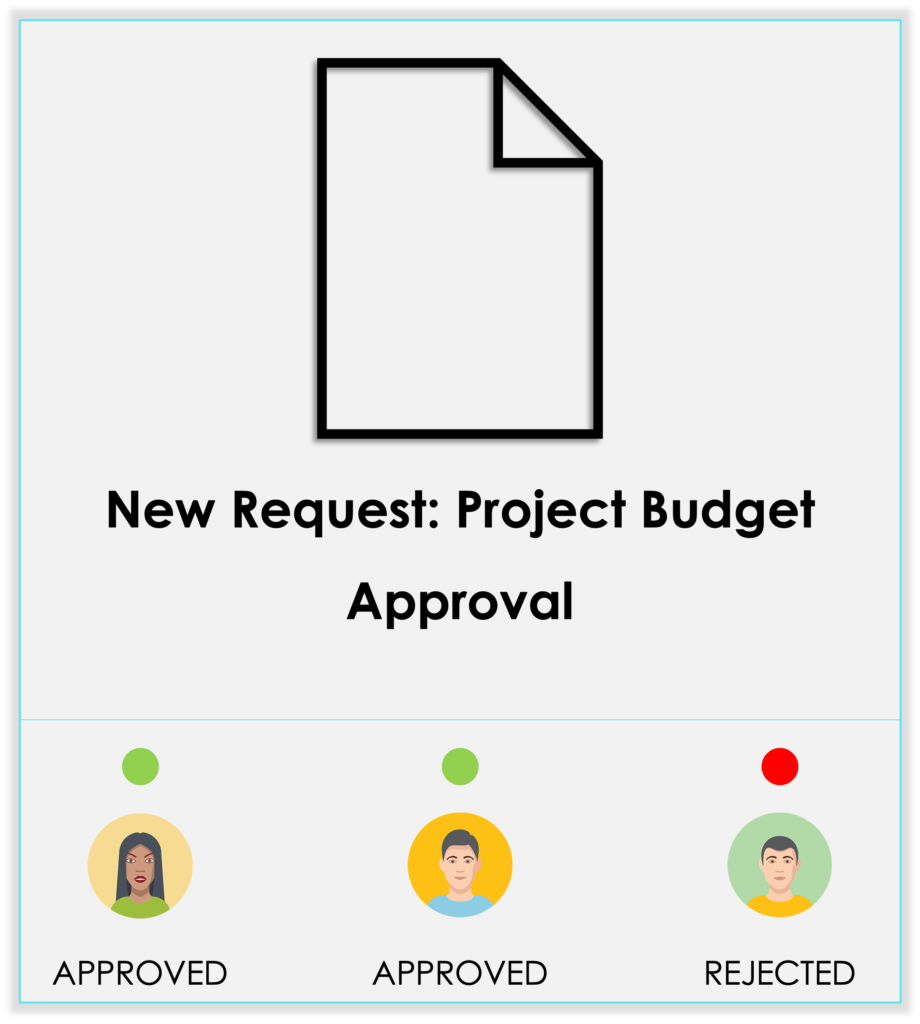
One more scenario is related to the high-cost expenses or invoices. For example, you have an approval policy that requires a pre-approval stage for each invoice over 10000$ before sending it to your Finance department.
Finally, let’s say you would like to control and protect your workspace and limit team creation in Microsoft Teams. In this case, you can build a multilevel approval workflow when your admin and operational director receive approval requests each time a project manager wants to create a new project team.
The use cases are endless and with Power Automate and its no-code solution, you’re able to build any automation flow that streamlines your approval process. And now let’s delve into the step-by-step examples.
White Paper: Project Management with Microsoft Teams
Learn how to use Microsoft Teams for effective project management

Set up multiple approvals in Power Automate
Let’s create a flow in Power Automate to set up multiple approvals. Suppose you’re a project manager and your project team is preparing a project plan. To finalize the project plan, you need to receive approval from various stakeholders. But before sending the approval request to them, you would like to revise the project plan yourself. Let’s see how you can foster and automate this multilevel approval process in Power Automate.
First, create a SharePoint list where your team can attach files related to your project planning and add metadata with key information. For instance, dates, responsibilities, status, etc.
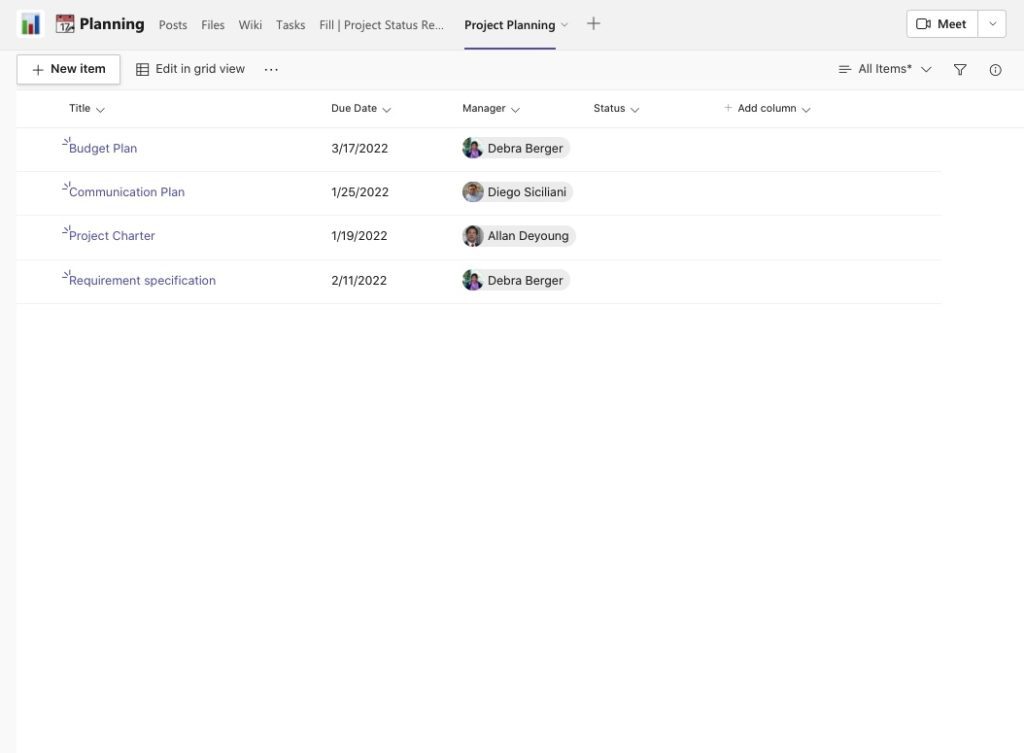
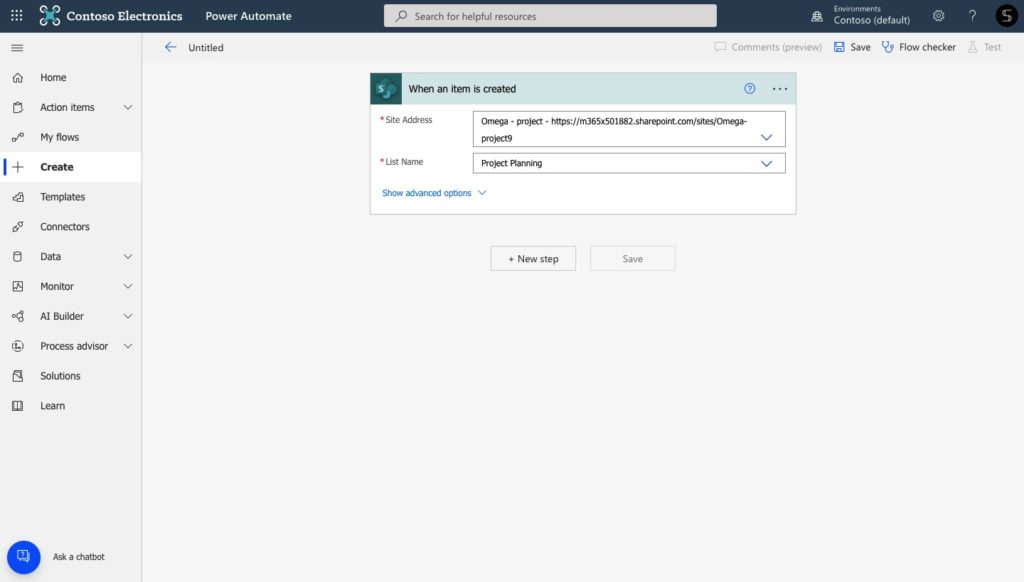
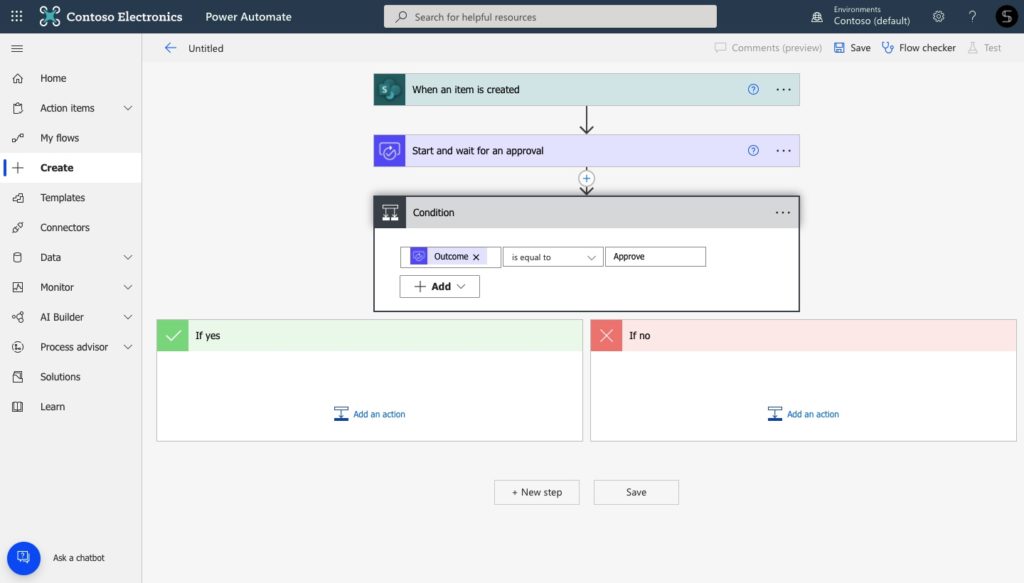
Next, go over the Power Automate and start a new flow. Choose the SharePoint trigger “When a new item is created” and choose the right SharePoint site.
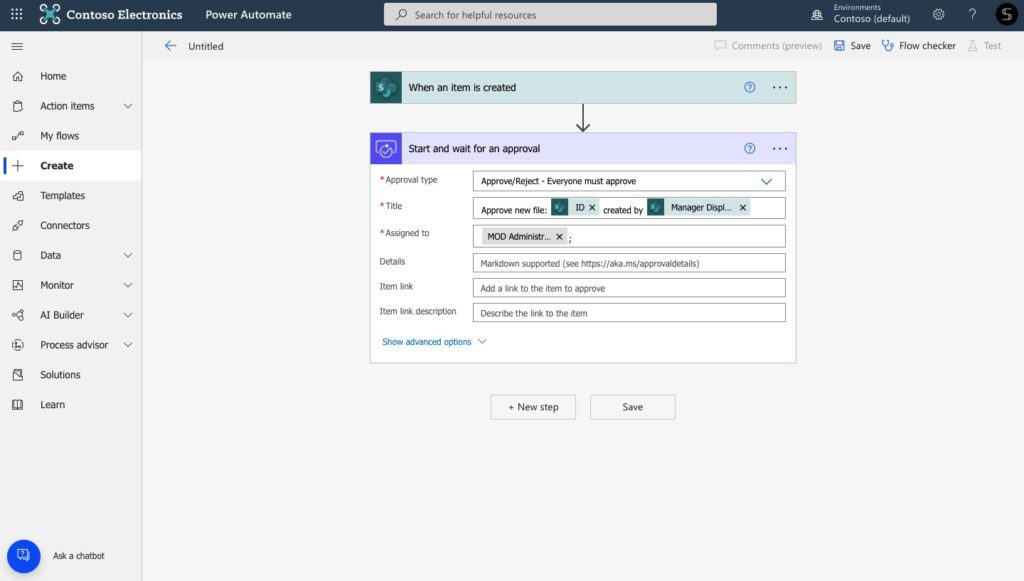
Then add an action from the Approval app “Start and wait for the approval.” Here you can choose multiple options, such as first to respond, everyone must approve, etc. At this step, you will receive a notification each time a new item is created by your team in your SharePoint item.
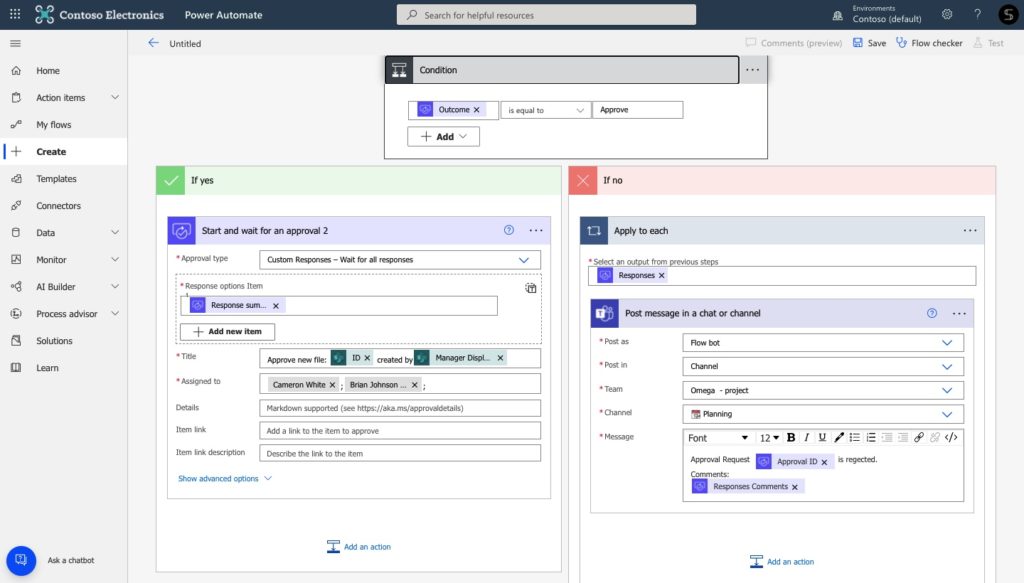
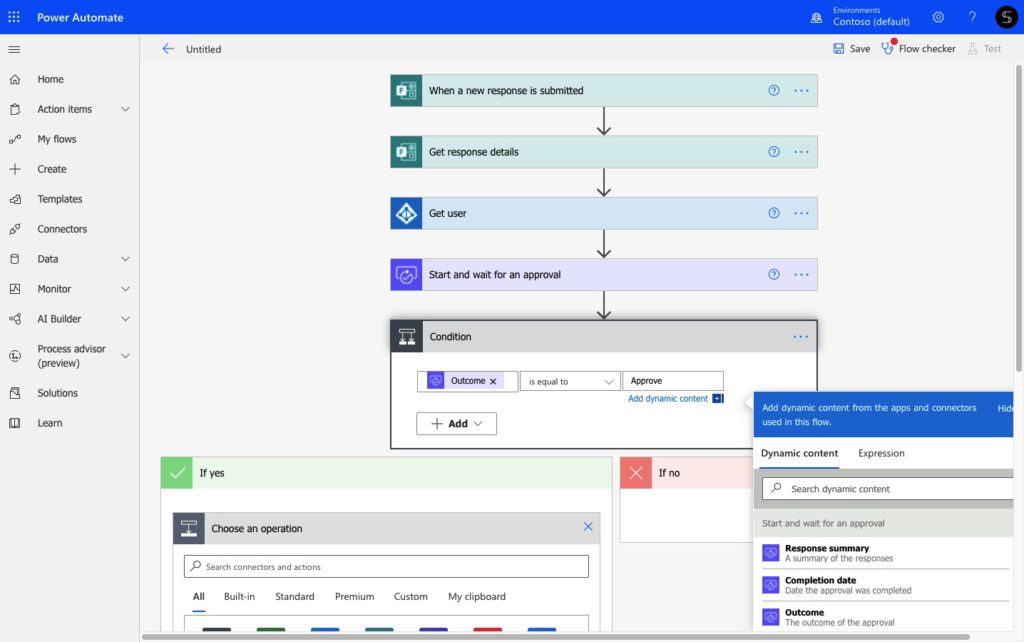
Now you need to add the second step of the approval process. Add “Yes/No” conditions, and type: “Outcome is equal to Approve.” If yes, you start a new approval process. Repete actions from the previous step and choose the right people, for example, your stakeholders. If the first approver has rejected the request, send the notification to your team with comments and details about what must be corrected.
With this simple flow, each new file related to the project plan will be sent to your stakeholders only after it is approved by the project manager. You can scale this approval workflow and add as many steps as required according to your operational scenarios.
Automatically update approval status indicator
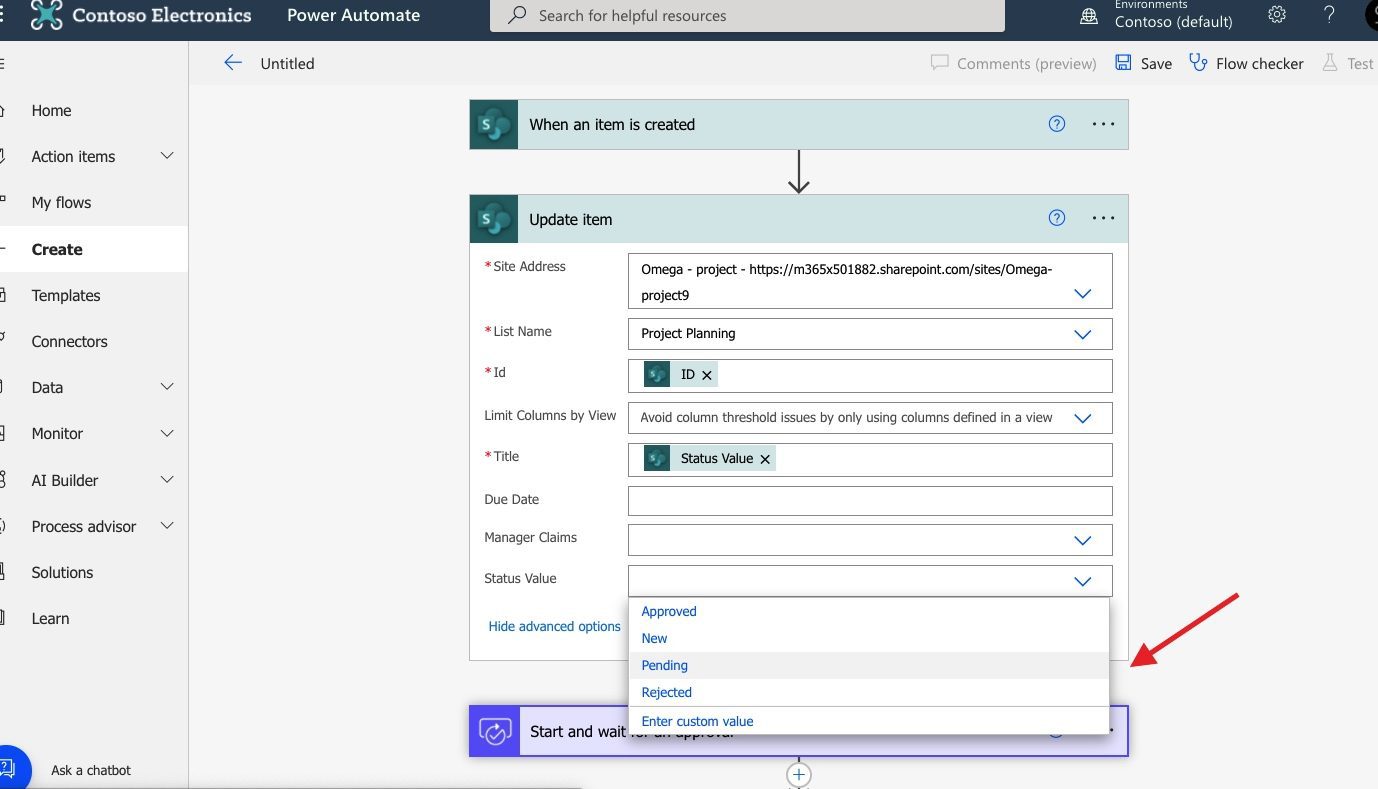
Now, let’s update our flow. Remember, we have a SharePoint list with the status column? In Power Automate you’re able to set up the multilevel approval workflow and update the SharePoint column automatically. So, if a new item is approved by all approvers, the status column will automatically change to Approved. By using this flow, you can easily track the approval process through your SharePoint lists. Let’s see how it works.
We begin with the same SharePoint trigger “When a new item is created.” Then add an action “Update item,” choose the right SharePoint site, add the dynamic content from the trigger to the related fields. And now, update the approval status, by choosing an option. In this case, we would like to update the approval status to “Pending” each time a new item is created in the SharePoint list.
Then you can repeat all the actions from the previous workflow where we have added the multilevel approval process. But in this case, we will update our flow by adding actions “Update item.” So, after the last “Yes/No” conditions are done (when the last approvers receive a request) add an action “Update item.”
If yes, we would like to update the Status column to Approved. If not, we update the status to Rejected.
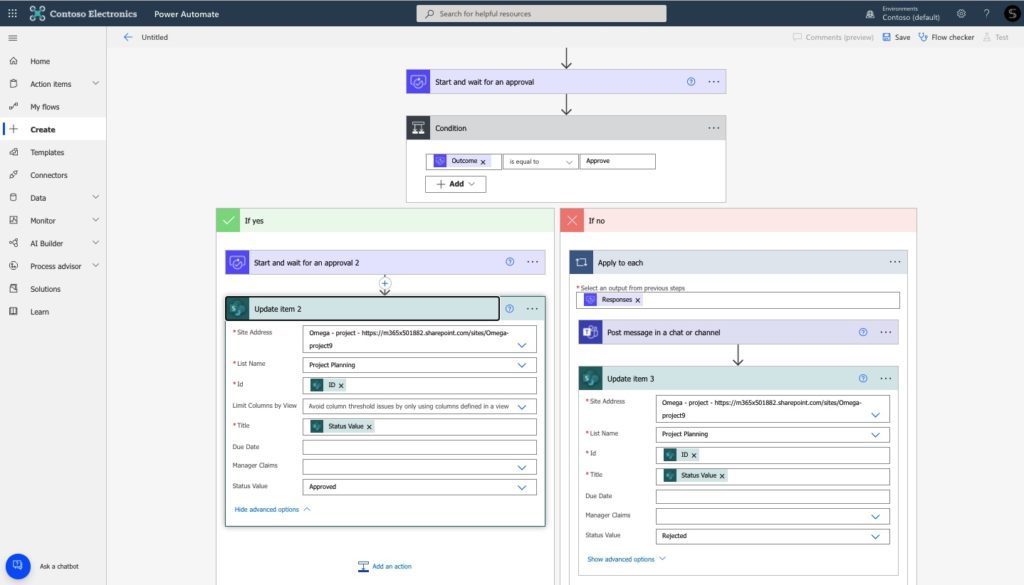
With this flow, you’re able to not only automatically send the approval requests, but also to update your SharePoint lists to easily track the approval process.
Add dynamic approvers selection for multilevel approval in Power Automate
Now, let’s discuss one more use case. Let’s say you’re a manager in the procurement department. Your team works with multiple suppliers, and they need to order the materials required for packaging and shipping on a permanent basis. To issue a new request, your colleagues create a new item in your “Production support items” list which reflects the name of the purchase, purpose, supplier, expenses, expected days of delivery, and the responsible person for a new order.
Learn how to create a team with SharePoint list already at place
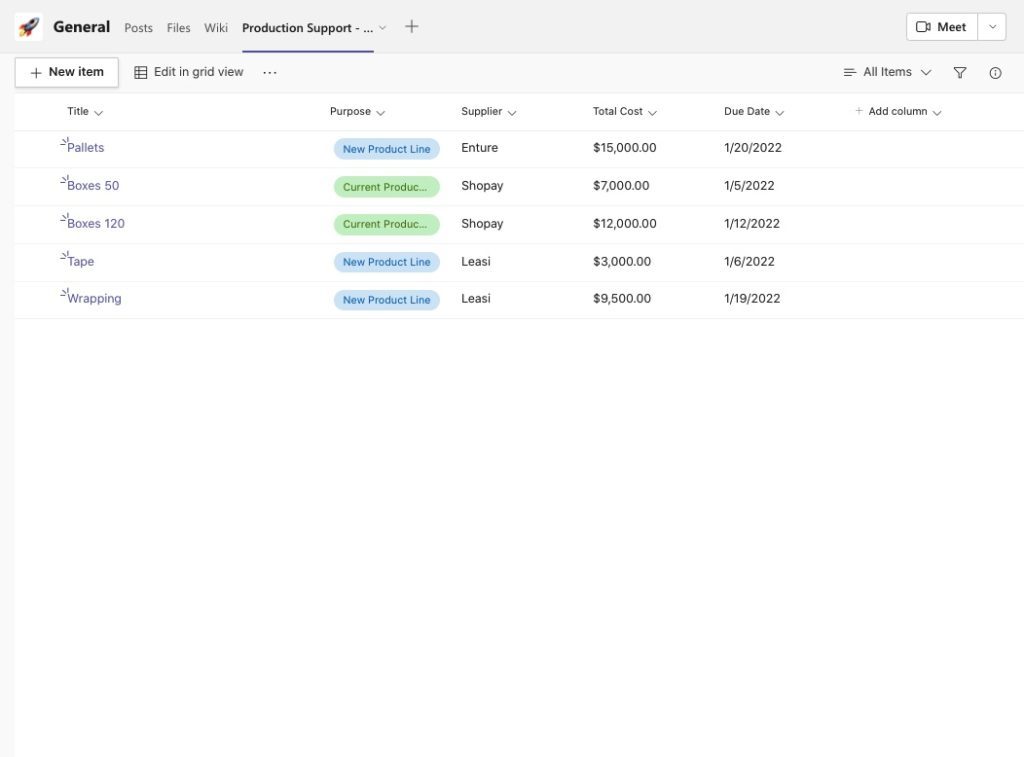
Each new request must be approved by your financial department before sending the order to the supplier. At the same time, you would like to add an additional approval step for each request where the expenses are more than 10 000$. Moreover, this request must be sent to the requester’s manager that is responsible for several types of purchases.
So, what do we have? We need to build the multiple stage approval process, with a dynamic listing of approvers and additional conditions related to the amount of expected expenses. Well, it’s an easy deal with Power Automate.
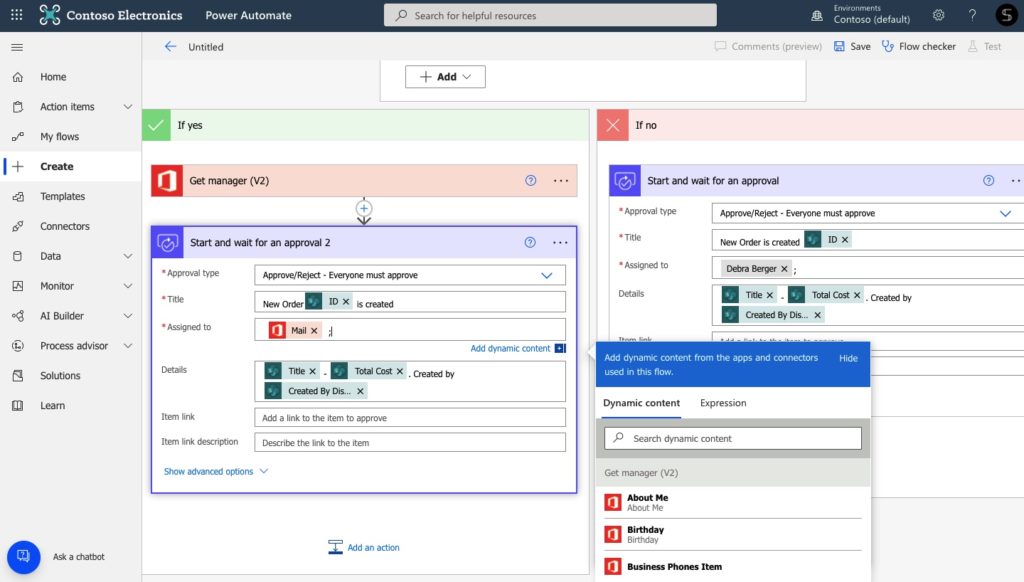
We start with the same trigger for the SharePoint item. Then add a new “Yes/No” condition for the amount of expenses. Add dynamic content from your SharePoint lists and set up a new condition. In our case, it’s “Expenses is greater than 10000”
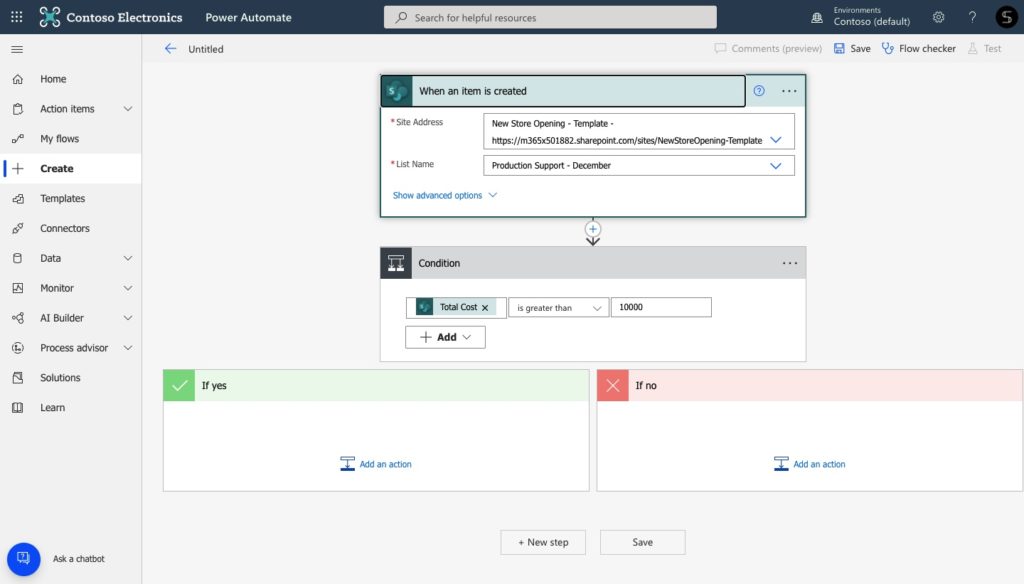
If no, we need only a one-step approval request and we are sending the request to our financial department. You already know how to do it.
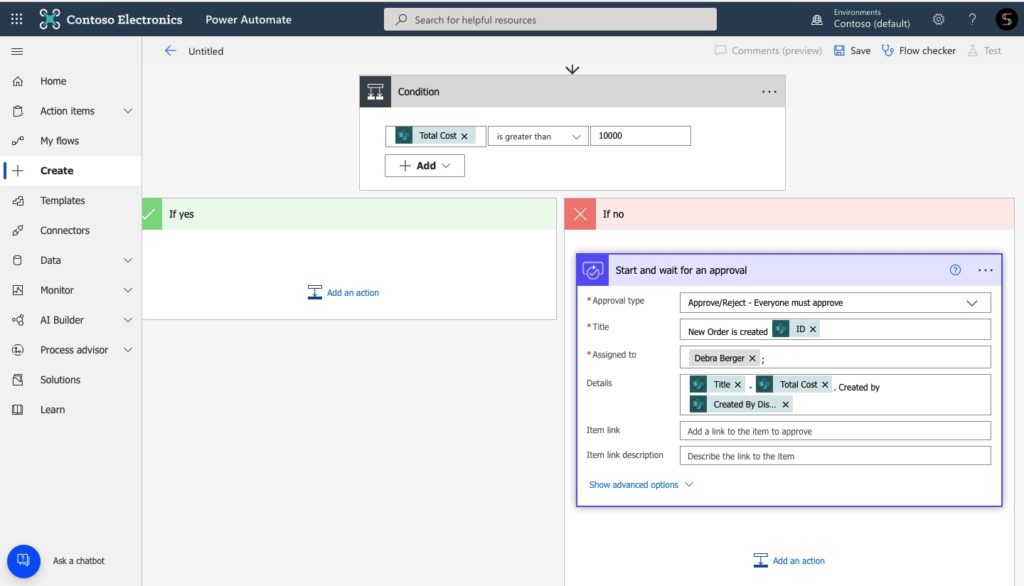
But if the expenses are over 1000$ we would like the request to be approved by the requester’s manager. To do this, add the action “Get manager.” Into “User” files, add a requester’s email using the dynamic content from the SharePoint list.
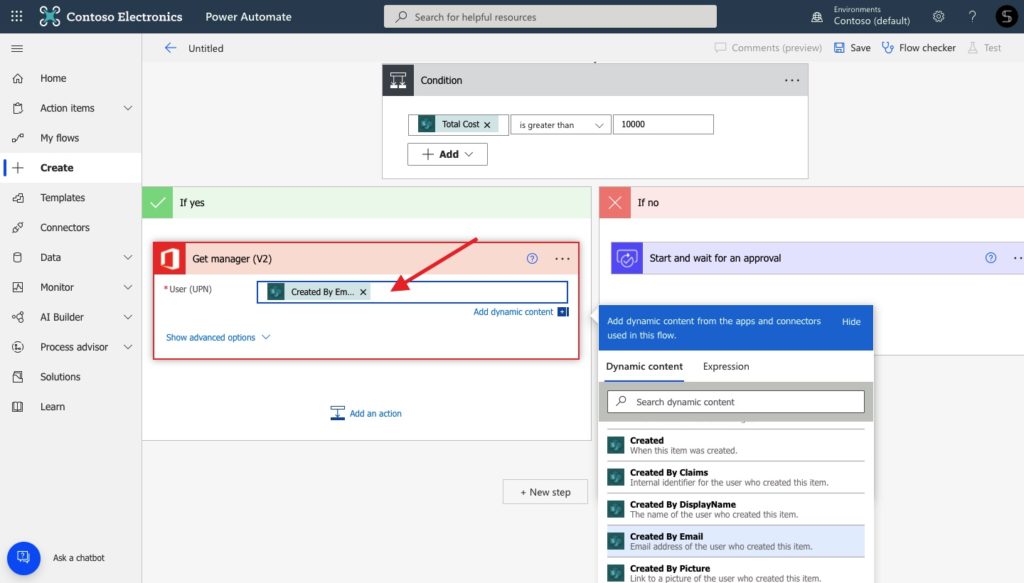
And now you are able to repeat your multilevel approval process that will be sent to the right manager on the pre-approval stage.
Control team creation at scale with the multilevel approval process
Finally, let’s delve into another scenario. Suppose you’re an operational director and you would like to control your Microsoft Teams environment to boost your teams’ productivity and streamline your internal processes. Indeed, when your workers can create multiple teams, you may face a mess in your Teams environment with unused and duplicated teams which leads to Teams sprawl. When you work in a big team, the process of team creation may lead to chaos and additional charge on your IT.
In fact, there are many ways on how to restrict users from team creation in Microsoft Teams. Today we describe how to do it with Power Automate workflows. For instance, you can control team creation by using Microsoft Forms. With this simple flow, you will get an approval notification each time a user submits the team creation form. Moreover, a team creation process will start automatically.
Read more about how to build the flow here.
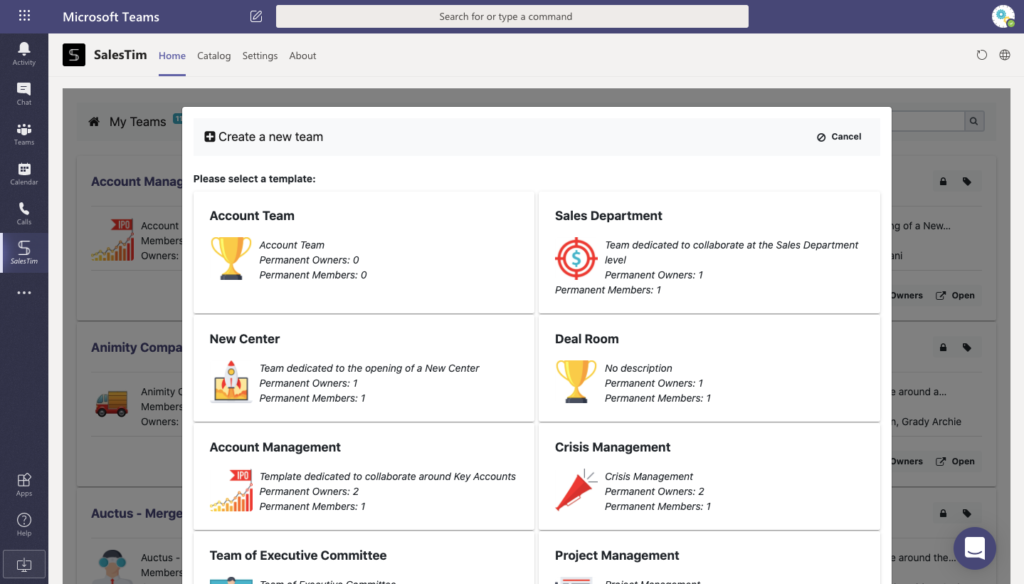
But there is a more efficient way. With Collaboration Templates technology you are able to structure your working environment and bulk create teams from your own Template Catalog. Moreover, with additional governance settings, you can easily set up the approval workflow for specific templates. Sounds great? Let’s see how it works.
Using the nBold app from the Microsoft Teams store you can create your own Template Catalog for any use case. Create Project Management Template to be able to quickly get a team once a new project is coming. Build Key Account Template to get the same level of execution from one team to another, Crisis Management to quickly tackle any crisis, and so on.
Explore more Microsoft Teams use cases.
Next, during the template creation, you can set up an approval workflow. Choose an approver (e.g. your manager, Teams admin, etc.). Next time, once a user wants to create a new team from the template, the approver will get an actionable message with all the request’s details.
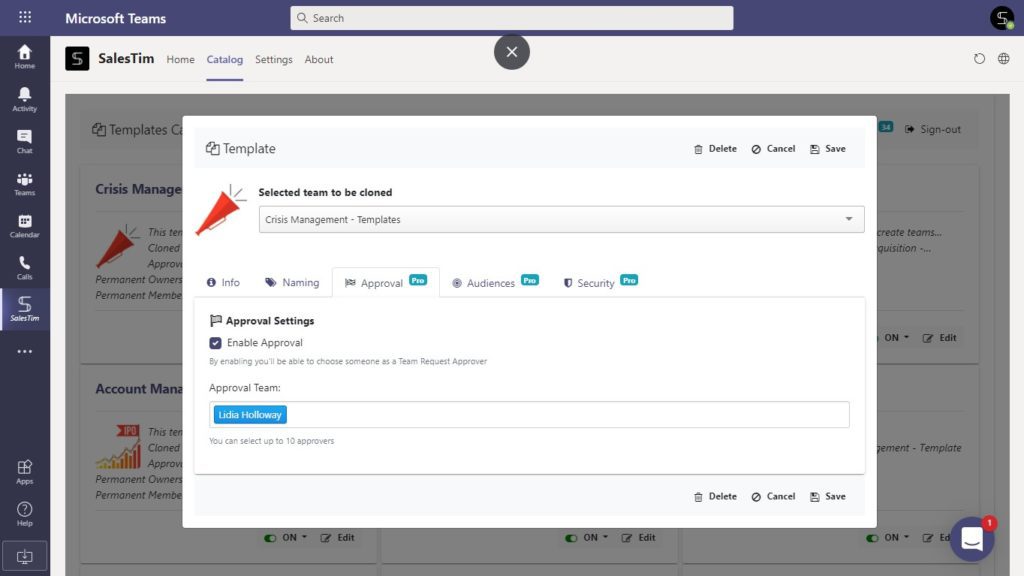
As soon as the request is approved, team creation will start automatically. Users will get a pre-built collaborative workspace with all the content, including:
- Same structure from one team to another
- Pre-built set of tasks
- File and folder templates
- Guidelines, execution playbooks, any 3rd party app integrated, and so on.
Finally, using the nBold connector for Power Automate you can build any custom flow related to your operational needs. Thus, you can set up the multiple approvals in case you need a pre-approval stage to create a new collaborative workspace.
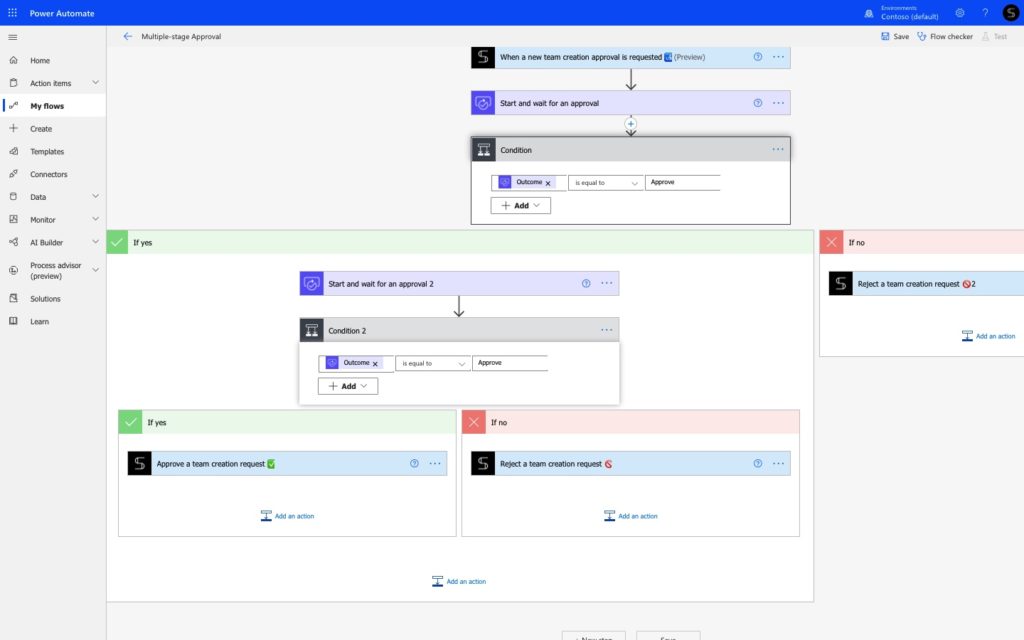
Read here how to build a multilevel approval workflow to limit team creation.
Contact our team and learn how to improve your collaboration at scale with Collaboration Templates, Collaboration Governance, and 3rd party apps integration.
