If your employees are actively using Microsoft Teams for collaboration, it’s just a matter of time till the question of the correct file management arises. You may want to make sure all organizational files are stored in a structured way and can be further reused when necessary.
In this blog post we’ll share with you best practices for file management in Microsoft Teams.
- 1. Understand where files are stored in Microsoft Teams
- 2. Organize your files in folders in Microsoft Teams
- 3. Add metadata for files in SharePoint library
- 4. Create a dedicated library to structure your documents
- 5. Build a Microsoft Teams file management system with templates
- 6. Use SharePoint hub sites to connect content around specific topics
- 7. Encourage collaboration and co-authoring of files in Microsoft Teams
- 8. Configure sensitivity labels
- 9. Train team members on file management best practices
1. Understand where files are stored in Microsoft Teams
To begin with, let’s understand where all your files go when you collaborate on them in Microsoft Teams.
Each team in Microsoft Teams has its own SharePoint site that serves as a document library for that team. Depending on where exactly you store or share a file in Microsoft Teams, it may end up in a different location within this site.
Standard channels
In Microsoft Teams, each standard channel has a dedicated folder in the team’s SharePoint library. Whenever your team members upload a file in Files tab of a standard channel, it will automatically appear in the folder named after that channel.
Private channels
Things are a bit different with private channels. Each private channel creates its own site collection that is separate from the original team’s site collection.
Shared channels
Microsoft has announced a new capability – shared channels – which are in fact a form of private channels. With shared channels, you will be able to collaborate with external users without the need to invite them to the whole team. Just like private channels, shared channels also have its own site collection in SharePoint.
Chats
When your users share files directly through private chats, however, they end up in users’ OneDrive for Business, in a folder called ‘Microsoft Teams Chat Files’.
For more information about where your data in Teams is stored you can consult Kevin Kieller’s blog post Taming Teams: Where’s My Data?
2. Organize your files in folders in Microsoft Teams
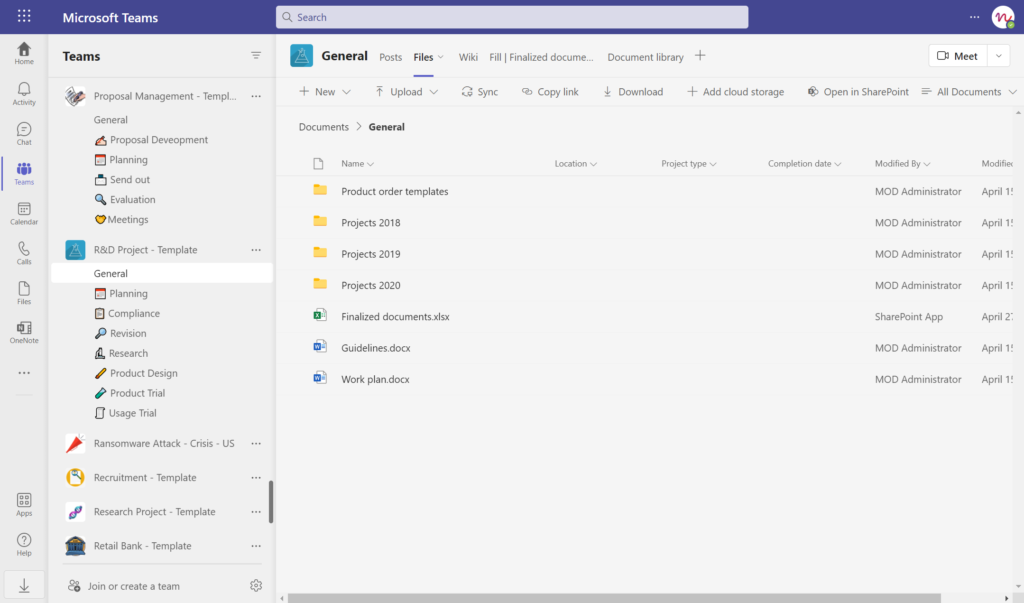
One of the best file management practices in Microsoft Teams is creating folders inside each channel and uploading all the files in those folders. You can copy the link to the right files and share it in a private message or a channel post.
If you attach a file directly to a conversation, it will be stored in the channel folder in the team’s SharePoint site. While you can always move files to necessary folders, doing so might take some time. Plus, if you have hundreds or even thousands of documents stored this way, it can easily get out of hand and become hard to navigate.
By separating all your files into different folders, you keep your document library structured and prevent file loss and duplication.

3. Add metadata for files in SharePoint library
Organizing files into folders can often do the trick to keep your document library structured, especially for small teams. However, sometimes the same files can fall into multiple categories. Therefore, putting them into only one folder may not be the most effective way to manage files.
Instead, you can add metadata to your files, which will help you categorize them according to different criteria. For example, if your team is managing company’s accounts, you can add the customer’s name to corresponding files. You can use this metadata to easily navigate through your documentation.
You can easily embed your SharePoint library as a Website tab in the right channel of your team. This way, your team members can view all the files through Microsoft Teams.
4. Create a dedicated library to structure your documents
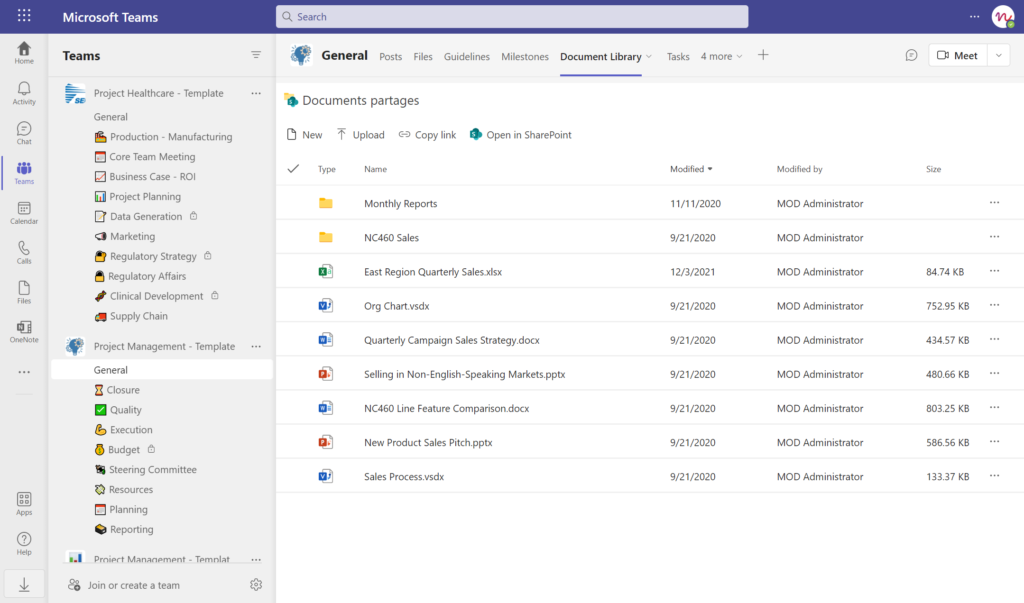
In addition to having a SharePoint site for every team in your organization, you can create a knowledge library to store all the finalized documents. By following this file management best practice, you will create a centralized space for keeping all the key data that can be further reused by your employees.
In fact, you may want to have a separate library for each key activity in your organization. For example, it can be a project management library with deliverables of all the projects your company undertakes. The same goes for research and development, account management, deal collaboration and other scenarios, depending on your organization’s activities.
Having a dedicated library for each work process will facilitate document search and sharing. It will allow to keep all the documents on a specific topic in the same location.

White Paper: Project Management with Microsoft Teams
Learn how to use Microsoft Teams for effective project management

5. Build a Microsoft Teams file management system with templates
Let’s say, in your organization there’s an R&D department that handles hundreds of projects. Needless to say, each of these projects requires a separate team. You may want to make sure all the finalized files are uploaded by users to a centralized document library. This can be done through Power Automate and Forms.
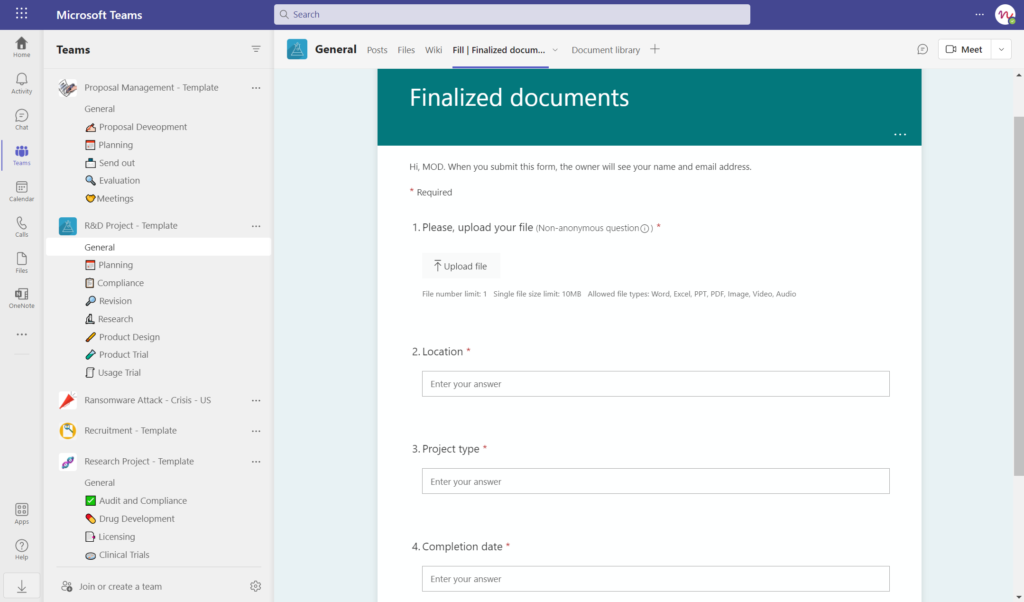
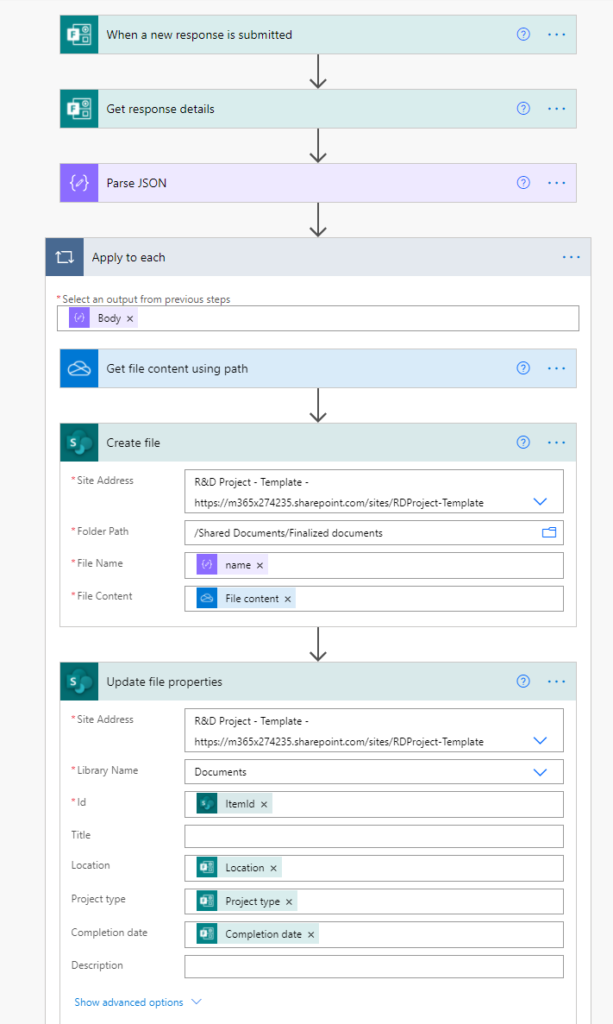
Create a form in Microsoft Forms and share it with all the R&D teams. They should have a Forms tab to submit documents and SharePoint Library tab to access R&D knowledge base. Then create a flow in Power Automate that would copy all the uploaded files into a dedicated document library. You can find detailed instructions in this article.
To facilitate this process, you may want to use Collaboration Templates by nBold. You will only need to create an original R&D team all the required channels, files, and tabs, including Forms and your SharePoint library once. Then, all the teams created from the template will have the necessary tools already in place.

Additionally, you can ask users to specify file details in the same form to use them as metadata. That can be project type, location, and completion date. Add these columns in your SharePoint library.


Then, create Update file properties action before completing your flow in Power Automate.

6. Use SharePoint hub sites to connect content around specific topics
Apart from having a SharePoint site per each team and a separate document library for finalized files, you can also organize your company’s documentation with SharePoint hub sites.
Hub sites help create a shared experience of related sites, bring together content around specific topics. For example, sales, HR, legal, IT, corporate news, etc. They provide a logical tie between sites.

→Download White Paper: How to Use Microsoft Teams for Sales Management
With hubs, you can provide a unified navigation experience and roll up news and events in a centralized location.
All you need to do is to assign your site to a specific hub and your site’s branding will be automatically updated.
To do it at scale for all the teams in your organization, you can use Collaboration Templates by nBold and Power Automate. With templates, you can connect sites created for each new team to a specific hub site.

For more information, check out our article on SharePoint and Microsoft Teams integration.
7. Encourage collaboration and co-authoring of files in Microsoft Teams
Collaboration is one of the key features of Microsoft Teams and it’s important to make use of it when managing files. Encourage team members to work on files together, either in real-time or by sharing changes and updates through version control.
You can also add some important files as tabs in chats and channels to make sure everyone has fast and easy access to them.
This can help to improve the accuracy and quality of your files, as well as increase efficiency by reducing the need for manual tasks and follow-up emails. Additionally, co-authoring can also help to promote teamwork and build stronger relationships between team members.
8. Configure sensitivity labels
Your users may need to collaborate on files with external players to get their job done. In order to protect your organization’s data, and prevent users from accessing sensitive files, you can configure sensitivity labels.
Sensitivity labels can encrypt emails and documents, mark the content when you use Office 365 apps, protect content in containers such as sites and groups, and apply the label automatically to files and emails, or recommend a label.

Learn more about sensitivity labels here.
9. Train team members on file management best practices
Finally, it’s important to train employees on file management best practices in order to keep their digital space structured and organized.
Here are some key elements you should include in the training:
– Naming files and folders. Establishing clear and consistent naming conventions for your files can help to make it easier to find the right files when you need them, and to keep your file structures organized.
– Storing and Sharing Files. Discuss the differences between storing and sharing files in Teams and in SharePoint, and the use cases for each. Emphasize the importance of uploading files to their respective folders first, and only then sharing them through links.
– Collaboration and Version Control. Teach team members how to collaborate on files within Teams and how to use version control to track changes and ensure everyone is working on the latest version.
Don’t forget to mention other elements we already covered in this article such as respecting the folder structure, sensitivity labels, metadata, and others that you deem relevant.
These 9 tips cover key best practices for effective file management in Microsoft Teams. If you’re wondering how to better manage files in Teams at scale, you may find Microsoft Teams collaboration templates as the most effective solution. Contact our team to learn how they can be applied in your organization.
